Measuring Stuff On Screen – Review 10

Now, imagine you are a graphic designer, image editor, picture enthusiast (or even a hapless website designer). You need to see the precise distance between two pixels.

What is one to do? Take a screenshot, open the image up in a fancy editor, then look for the helpful image resolution somewhere in the status bar.

Alternatively . . .

KRuler

KRuler Logo

KRuler is a nice graphical tool for determining those pesky distances. When launched, it places a virtual ruler marked out with pixels on your screen.

A sample KRuler, with a small black arrow pointing to the 454 pixel mark.

A sample KRuler, with a small black arrow pointing to the 454 pixel mark.

While the mouse is over the KRuler window, a straight black arrow extends out from the line. This, in addition to the precise pixel distance displayed at the 0-end, make it significantly easier to measure onscreen distances.

KRuler can do a bit more than just that, though. The colour of the pixel located at the tail of the arrow is shown next to the pixel number. There are also quite a few configuration items available by right-clicking on the ruler. Orientation, transparency, colour, and even the font can be changed if you want to.

KRuler context menu. Many aspects of the ruler can be changed - here the font size is larger and the ruler is measuring percentages.

KRuler context menu. Many aspects of the ruler can be changed – here the font size is larger and the ruler is measuring percentages.

Overall, I’d say that this is indispensable for those times when you need a ruler.

Price $0 (Free)
Compatible OS‘s Anywhere KDE is available (Linux, BSD, Mac OS X, etc.)
Licensing GNU General Public License v2

Character Maps – Discussion 1

You might remember my introduction to the Compose key a few weeks ago. While the default settings in each of the programs I reviewed are usually good enough for common characters, what do you do when you need something that they don’t list?

If you have Internet access, then a simple Google/Yahoo/DuckDuckGo/Bing search for its description should be enough to find it. Then you can just copy and paste the character wherever you please. If you’re going to use it a lot in the future, then the best action might be to add a new entry to the compose key database so you can type it faster.

Don’t give up hope if you don’t have (reliable) Internet access – your OS has a built-in tool to help.

The Character Map

On Windows and *nix this tool is known as Character Map (or a direct translation thereof); on Mac OS X it is Character Palette. It contains a long list of every character from each font installed on your computer.

Select a font (or use the default), then start scrolling to find the character you want. A menu on the side lets you change which category of characters is displayed. Double-click a character to add it to the text-box at the bottom of the window, from whence you can select and copy it.

Click on the thumbnails below to enlarge them.

GNOME 3.6

Windows 7

KDE 4.10

Mac OS X 10.5.8

Telling the Phase of the Moon – Review 9

Times exist when you might want to know what the moon looks like. This urge can present itself at importune moments – during a bright, sunny day; when the moon has already set; when your internet connection has been lost. To get around this issue, I turned to software (well, why not?).

Moonphase/Månfas

Månfas Icon


Moonphase is a useful little tool for displaying the current phase of the moon.

There is one version each of the program for Swedish and French-speakers. The English version is further split into a Northern hemisphere program and a Southern hemisphere program. As far as my non-rigorous testing could determine, they are functionally identical.

The main window of Moonphase SH, showing the phase of the moon, a calendar (for selecting future or past dates), and an interactive map.

The main window of Moonphase SH, showing the phase of the moon, a calendar (for selecting future or past dates), and an interactive map.

The program is chock-full of features. In the top left is the current phase of the moon, with its accuracy listed in the lower left (usually ±1 day). Below that are dates for major moon phases in the current month – New Moon, First Quarter (Waxing), Full Moon, and Last Quarter (Waning). Just to the right of these phases, taking up much of the lower-central part of the user interface, are controls for choosing a location on the Earth.

As the phase of the moon is dependent on where it is measured, take care to enter the latitude and longitude correctly. You can use the pair of scrollable degree lists, or click at the precise location on the map in order to set the location. Full instructions are available by clicking on the button labeled HELP (on/off).

Image of the Swedish version of the program.

Image of the Swedish version of the program.

Above the map is a calendar for choosing year, month, and day. A small button to the right allows switching Sunday from the beginning of the week to the end. Below the button panel on the right are important moon facts (against a dark background) and sun facts (against a light background).

These include:

  • moonrise
  • moonset
  • moon phase
  • moon distance
  • sunrise
  • and sunset.

My only complaint is that Moonphase does not show up in the taskbar while running. All in all, though, it is a brilliant program.

Price $0 (Free)
Compatible OS‘s Windows XP,Vista,7,8
Licensing Generic Freeware License

Changing Audio Files So They Work – Review 8

Times exist when a media file is simply unplayable. Perhaps your cell phone can’t decode Matroska videos, or your favourite music tagger refuses to touch wavs. For all intents and purposes, you must choose between abandoning the file and abandoning the media tool. That is, unless you are willing to transcode the file.

XMedia Recode

XMedia Recode Logo

XMedia Recode draws on the power of multiple free encoders and decoders, not unlike LASTAR. However, the programs have separate missions.

XMedia offers a straightforward interface for transforming music files:

  1. Click the Open File button at the top left to pick your input.
  2. Choose the output profile from the extensive dropdown list.
  3. Click the Add Job button when the settings are to your liking.
  4. Repeat the above 3 steps for each additional file.
  5. Click the Encode button at the top of the window.

The new files are placed in the same folders as their sources. This can be changed in the dropdown at the base of the window.

The format tab, shown upon starting the program for the first time. Near the top, under the button bar, is space for a list of source files (audio and video).

The format tab, shown upon starting the program for the first time. Near the top, under the button bar, is space for a list of source files (audio and video).

Multiple audio tracks can be pulled into one file or separated out on the Audio tab of the display. Video effects like color correction, conversion to greyscale, vertical flipping, cropping, and resolution are managed on the Filters/Preview tab. The program also has space for editing file metadata (a.k.a. music tags). Unfortunately, it can be easy to get confused in all the features and menus.

XMedia Recode is not really capable of enhancing audio – that’s primarily LASTAR’s domain. Xmedia’s strength lies in its ease of transcoding files to desired formats.

A small fraction of the different manufacturers supported. A user only needs to choose how the file will be used in future.

A small fraction of the different manufacturers supported by XMedia. A user only needs to choose how the file will be used in future.

Ultimately, I can say that XMedia Recode is near the top of its class. It uses a variety of free libraries to great effect (FFMPEG, FAAC, FAAD2, LAME, XVid, Ogg, Theora, libdvdread, Vorbis, x264, libvpx, and libbluray, according to the about dialog). While not suitable for high-end audiovisual editing, it is more than capable of recoding.

I strongly recommend it to people interested in converting audiovisual media from one format to another.

Price $0 (Free)
Compatible OS‘s Windows XP,Vista,7,8
Licensing Generic Freeware License

Identifying Colours – Review 7

When I look at the computer screen, I normally just consider the content. Does it really matter whether something is light grey or dark grey?

To professional creators (e.g. artists, filmmakers, designers, and programmers), the precise colour displayed can be a very important consideration. Even a non-technical user might want to make sure their pictures and captions are the same shade.

Hexdecimal

Hexdecimal Logo

Hexdecimal (spelled differently from ‘Hexadecimal‘) is a nice little ‘eyedropper’ tool to determine what colours are shown on your screen.

When opened, it shows a customizable window with a palette, two trios of color sliders, a list of text boxes, and a status bar.

Default appearance of Hexdecimal.

Default appearance of Hexdecimal. In contrast to most programs, the Save, Open, New file, and Keep on Top buttons are located below the rest of the interface.

The text boxes on the right side display the current colour in six different formats:

  • CSS-friendly
  • Hexadecimal (uppercase)
  • Hexadecimal (lowercase)
  • Red, Green, and Blue levels in decimal
  • CMYK (useful for printing)
  • Common name

Click on one of them to copy the displayed text.

If you have recently copied something that Hexdecimal understands as a colour, then the ‘Paste’ button will be enabled. Click the button to display information about that colour.

What if you want to know more about an actual colour that you see on the screen? Left-click once on the large coloured rectangle in the middle of the window, then move the mouse so it’s pointing at the desired item. Holding down the left-mouse button will let you scan multiple on-screen colours. The program will only pick up a new colour when the mouse is motionless.

By default, the Hexdecimal window will remain on top of all other windows. Click the pin icon to toggle this setting.

If the program doesn’t quite work as you need, there is a helpful ‘readme.txt’ file bundled along. It includes full explanations for each of the multiple settings Hexdecimal understands.

Readme (right), file listing (left), and Hexdecimal (top).

Readme (right), file listing (left), and Hexdecimal (top).

All in all, Hexdecimal is a very nice tool. There are many competitors which offer eyedropper functionality, but I feel that Hexdecimal can easily hold its own.

Price $0 (Free)
Compatible OS‘s Windows XP,Vista,7,8
Licensing Generic Shareware License

Improving Music Quality – Review 6

Often, music files do not quite sound perfect. The vocals may be too quiet, the drums unintentionally overpowering, or something else entirely. Programs that play music sometimes offer equalisers that can change the relative volumes of individual sounds.

But what of the music players without dedicated equalisers? You will need either to put up with the music file’s quirks, or to perform permanent changes to the music file.

LASTAR

Icon for LASTAR: an ear listening to a stylised microphone.

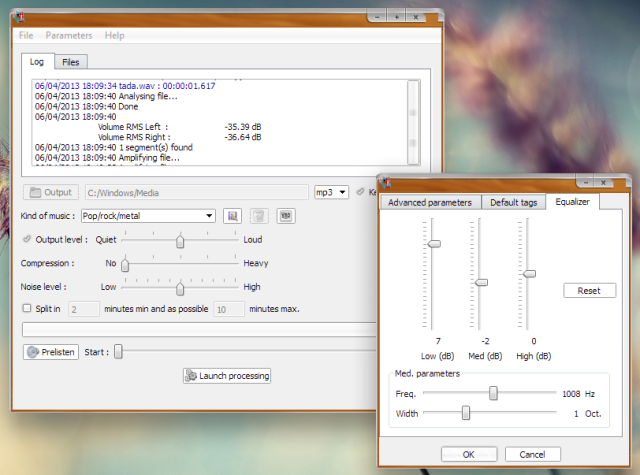
LASTAR is the fine product of Arnaud Champenois, also known as Arthelion. The actual audio work is performed with the help of a few famous projects: libsndfile, libmpg123, FFTW, LAME, and Qt. That’s not to say that this is just a basic graphical shell over some pwerful components – on the contrary, LASTAR is highly effective. It offers coarse modification of the entire processing process, from file size to maximum volume.

Sample use of LASTAR - The main window shows a log of recent actions, the most common modifications, and even multi-file support.

Sample use of LASTAR – The main window shows a log of recent actions, the most common modifications, and even multi-file support.

High recommendations come from me – LASTAR is a very straightforward tool for changing up the volume levels of a music track. It can even split the file into equal-length pieces and convert it to a different format in the process.

Price $0 (Free)
Compatible OS‘s Windows XP,Vista,7,8
Licensing GNU General Public License 3

Typing More Complex Characters – Review 5

There are many times when the default keyboard layout is sufficient. The base character set ASCII is enough for most text in English and a number of other languages that also use the Latin alphabet.

However, there are times when 128 characters are just not enough. You may want to type one of the over 100,000 characters defined within Unicode. That’s when I look at the compose key. The two keys pressed immediately after this are combined into a single symbol.

Unfortunately, a dedicated compose key is rare to find on keyboards. Windows has built-in support for a compromise: by holding Alt and typing out a specific number, you can generate some of the more sought-after characters not available on your keyboard.

For Windows users, I recommend Zive FreeCompose.

FreeCompose

FreeCompose program logo.

While running, FreeCompose allows the user to reassign one of the standard keyboard keys for use as compose. Additional configuration options are offered for the Caps Lock key, one of the most popular choices.

Options and 'About' dialogs for FreeCompose 1.1.0.5

FreeCompose options dialog, available from the right-click menu, allows you to change what characters specific key combinations will form.

Mac and Unix-like Configuration

Mac OS X and X Window-using systems come with compose key support. They require only a little setup.

Mac OS X users can set one key to act as compose with a little work – see Bob’s guide for details. All you need to do is place (by copying or creating manually) a new keybinding file in the appropriate folder.

The keybinding file holds all the relations between entered and composed characters. Editing this file is the only step needed to change how compose works. FreeCompose’s options dialog does the same thing, but is more user-friendly.

Users of other operating systems can either look at the section of System Settings devoted to keyboard shortcuts or edit the Xorg configuration. Compose key shortcuts are built into X and don’t need to be entered manually.

Either way, the compose key is a powerful tool for typing letters and symbols that may otherwise be challenging to enter.

Price $0 (Free)
Compatible OS‘s Windows 2000,XP,Vista,7,8; Most (if not all) other OS’s
Licensing The New BSD License

Keeping the Display on – Review 4

This week, I’m discussing a handy little tool called caffeine.

A window listing caffeine's version, purpose, icon, command-line options, and website.

The built-in ‘About’ window.

Caffeine prevents the computer from going into sleep or hibernation. Open the program to start it running, disable it by double-clicking the tray icon that appears, or right-click the icon and choose Exit to exit it.

To learn a little more about what went into caffeine, I sent a few questions off to its creator, Tom Revell.

  • Safely Remove: How did you come up with the idea for caffeine?
    Tom Revell: I decided to write the app because I was subjected to what I considered to be a draconian screen lock policy by my IT department. I’m well aware of security concerns, and never leave my workstation without locking it first, but from what I recall it was set to 3 minute or something similar. I could be sat looking at information on the screen and the darn thing would lock, so I looked for a way around that happening.
  • Safe: Have you seen anyone else offer similar software?
    Tom: Yes, there are other pieces of software which perform the same function, including one which is for the mac which has the same name. Well, it’s an obvious name for something which keeps your machine awake…. A few years back I found that someone had taken my app, and used ResHacker to make it look like they had written it instead! I altered my code so that it’s not quite as simple to steal.
  • Safe: How does the program work so consistently?
    Tom: As for working consistently – I’m not sure what you mean. Perhaps you mean “how come it doesn’t crash” at which point I’d either reply “because I’m a great developer!” or more realistically “because the code is so simple”.
Price $0 (Free)
Compatible OS‘s Windows 98,2000,XP,Vista,7,8
Licensing Freeware license

Magnifying the Screen – Review 3

Ever want to magnify just part of your computer screen? There are a number of tools out there that can help with this task, not least of which are those included with the operating system.

Zoom

Zoom is the program of choice for Mac OS X users. It can be enabled or disabled by pressing Alt-Command-8.

A screenshot highlighting the middle segment of the 'Seeing'-related Universal Access options.

Location of Zoom preferences in the Universal Access part of System Preferences.

When enabled, just press (and optionally hold) Alt-Command-= to zoom in, or Alt-Command– to zoom out.

Zoom comes standard on all Mac systems.

KMag

KMag is a program included by default with the KDE Software Compilation, which in turn is available for Windows, Mac, Linux, BSD, and others.

Demonstration of KMag's screenshot, 'zoom out' and recursive zoom features.

Demonstration of KMag’s screenshot, ‘zoom out’ and recursive zoom features. The blurred effect was added to the screenshot in a separate program.

KMag, like many of these programs, has a static window which shows a specific section of the screen. Unlike the other environments, though, KDE includes an additional ‘desktop effect’ which is much easier to control.

The program also lets you rotate the magnification, add post-processing filters, or even zoom out.

GNOME-Mag

GNOME-Mag is the default magnifier of the GNOME desktop environment.

Windows Magnifier

Magnifier is the default magnification tool of the Windows desktop.

Magnifier lens showing some of the Ease of Access Center, as described in the caption.

Demonstration of Magnifier’s separate lens, inverted colours, and 150% magnification.

It can be started from the Ease of Access Center, which can be found in the Control Panel. Pressing Windows-U will launch this Center directly.

The main magnifier window - effectively a floating toolbar. Behind the window is Windows 7's Ease of Access Center.

Screenshot of the magnifier in its default state – 100% magnification.

Features include a separate dockable lens, inverted colours, and autostart on login – all optional. However, there are no keyboard shortcuts for zooming.

OS Default Magnifier Program
Windows XP,Vista,7,8 Magnifier
Mac OS X 10.5, 10.6, 10.7, 10.8 Zoom
GNOME Desktops GNOME-Mag
KDE Desktops KMag & Magnification Effect
Price $0 (Free)
Compatible OS‘s Whatever you’re currently running.
Licensing Same license as the rest of the shell – Microsoft License, Apple License, or GPL

Darkening the Computer Screen – Review 2

After reading a review from Lifehacker describing Kino, I decided to take a look at this tool.

Kino

Kino Program Icon

Kino can darken your computer screen over a broad range of values, from a completely transparent filter all the way to opaque black. A small selection tool lets the user highlight an area that should not be darkened.

Example use of Kino, with Taskbar fully visible and 50% opacity.

Example use of Kino, with Taskbar fully visible and 50% opacity.

The Page-Up and Page-Down keys increase and decrease the opacity of Kino’s filter, respectively. Clicking on the red + sign, then clicking-dragging over the obscured display allows for at most one untouched rectangle of screen. At its maximum opacity, all but the (optional) selection and/or Taskbar are completely black. This feature is incredibly handy for focusing on one task or item at a time.

Using the crosshair tool to delineate a small segment of the screen. Opacity is set to 100%.

Using the crosshair tool to delineate a small segment of the screen. Opacity is set to 100%.

Similar tools do exist to perform this within web browsers (I recommend interested readers look at Stefan V.D.’s popular Turn Off the Lights extension).

The program’s name (Kino is German for cinema) and curtain-themed icon suggest that it was made for video viewing. Kino’s versatility, though, makes it more than capable of extending the range of monitor/backlight brightness settings as well. Even multi-monitor setups are supported.

When considered along with the ease of setup and removal, this versatility is definitely reason enough for me to use Kino regularly.

Price $0 (Free)
Compatible OS‘s Windows XP,Vista,7,8
Licensing GNU General Public License version 2